

What is it
Elastic Shell is an open source project that includes a set of command line utilities and run as a client to help you manage Elasticsearch. It is entirely written in Bash Shell.
“Elastic Shell 101” is a series of posts that tells you how to use it.
In this post, I will show you how to use Elastic Shell index command to manage Elasticsearch indices.
Create index
Let’s use index create command to create an index.
bash-4.4# elash index create

Commands/Options:
  companydatabase
  github
  ...
You will notice a list of indices that can be created. This actually comes from what we put in the config folder.
Config folder
Elastic Shell has a folder that includes all configuration required during the run. It’s a sub-folder in the Elastic Shell home folder. Let’s take look at its overall structure:
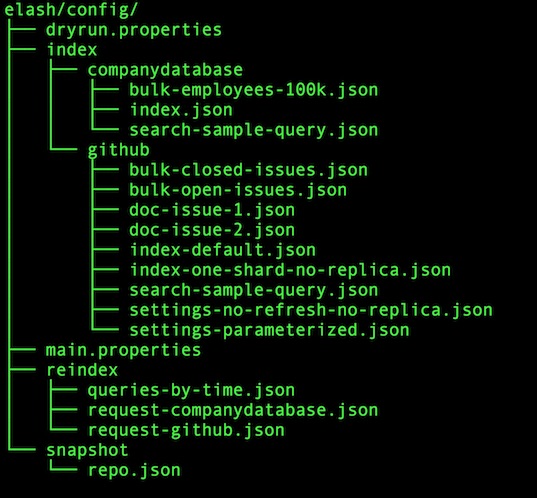
The main.properties file includes the general configuration. Other sub-folders include the detailed configuration that will be used by particular command.
Let’s take closer look at index folder, and we will talk about other folders later. We see two sub-folders in index folder, each of which maps to an index. The index name is actually the folder name. So, what the index create command lists are actually the folder names.
There are a couple of sample indices distributed along with Elastic Shell. Choose one of them and append after the index create command. For example, the github index represents all the GitHub issues of the Elasticsearch project on GitHub.
bash-4.4# elash index create github

Commands/Options:
  index-default
  index-one-shard-no-replica
  none
Then, you will see the available index configuration, where each one maps to a file in JSON format under the index folder. For example, index-default maps to index-default.json. Add more JSON files where the filenames start with index. They will be added to the above list.
Option none
There is a special configuration option called none. This maps to empty request body when we send request to Elasticsearch to create an index. It tells Elasticsearch to use the default settings when create index.
Here, let’s use index-default and check the content of index-default.json at first. It includes the mappings and settings for the github index:
bash-4.4# cat elash/config/index/github/index-default.json
{
    "mappings": {
      "issues": {
        "properties": {
          ...
          "title": {
            "type": "text",
            "fields": {
              "keyword": {
                "type": "keyword",
                "ignore_above": 256
              }
            }
          },
          "updated_at": {
            "type": "date"
          },
          ...
        }
      }
    },
    "settings": {
      "index": {
        "number_of_shards": "5",
        "number_of_replicas": "1"
      }
    }
}
Let’s append index-default after index create command.
bash-4.4# elash index create github index-default

Create github
-------------------------------------------------
{
  "acknowledged": true,
  "shards_acknowledged": true,
  "index": "github"
}

Commands/Options:
  companydatabase
  github
  ...
When we see this, it tells us the index has been created successfully. This is actually the returned response from the Elasticsearch cluster.
Create more indices
We can create more indices in one line. It’s easy. Just chain more indices with their configuration. For example, we can create both the index github and companydatabase. Choose index-default.json for github and index.json for companydatabase.
bash-4.4# elash index create github index-default companydatabase index
Update index settings
After create index, we can update the index settings using index update command. Choose index github:
bash-4.4# elash index update settings github

Commands/Options:
  settings-no-refresh-no-replica
  settings-parameterized
You will see the available settings that maps the settings files in the index configuration folder. The two files which the names start with settings map to the available settings that are listed above when we run index update settings command.
Let’s take look at settings-no-refresh-no-replica.json at first:
bash-4.4# cat elash/config/index/github/settings-no-refresh-no-replica.json
{
  "index": {
    "number_of_replicas": 0,
    "refresh_interval" : "-1"
  }
}
As the filename explains, it defines the number of replicas zero and disables the index refreshing. Use it to update the index settings:
bash-4.4# elash index update settings github settings-no-refresh-no-replica

Update github Settings
-------------------------------------------------
{
  "acknowledged": true
}

Commands/Options:
  companydatabase
  github
  ...
Then run index cat indices command and check the rep column to see if the settings update has taken effect.
Parametermized config
Check the other pre-defined settings settings-parameterized.json:
bash-4.4# cat elash/config/index/github/settings-parameterized.json
{
  "index" : {
    "number_of_replicas" : "@@index_number_of_replicas",
    "refresh_interval" : "@@index_refresh_interval"
  }
}
You may notice that the actual values of the above two settings are parameterized. These are defined as variables in main.properties, where you can see the default value of index_number_of_replicas is one, and the default value of index_refresh_interval is 30 sec. This can be overridden by defining environment variables.
bash-4.4# cat elash/config/main.properties
# net settings
net_host=${net_host:-http://elasticsearch:9200}
net_use_ssl=${net_use_ssl:-false}
net_ssl_no_validate=${net_ssl_no_validate:-true}
net_client_cert=${net_client_cert:-./certs/admin.crt.pem}
net_client_key=${net_client_key:-./certs/admin.key.pem}
net_certificate=${net_certificate:-}

# index settings
index_name=${index_name:-github}
index_number_of_replicas=${index_number_of_replicas:-1}
index_refresh_interval=${index_refresh_interval:-30s}
...
Add documents
Now, let’s try to add some sample documents to the github index. Run index doc add command, choose github as index, and append issues as document type.
bash-4.4# elash index doc add github issues

Commands/Options:
  doc-issue-1
  doc-issue-2
You will see the list of all pre-prepared sample documents. Each one represents a real github issue grabbed from the Elasticsearch project on GitHub. They can also be found in the index configuration folder. As always, we can add multiple documents in one line. Let’s add all the sample documents as below:
bash-4.4# elash index doc add github issues doc-issue-1 doc-issue-2
Run bulk
A more efficient way to add multiple documents is to use Elasticsearch bulk API. This is also supported by Elastic Shell. Let’s run index bulk command and choose github index.
bash-4.4# elash index bulk github

Commands/Options:
  bulk-closed-issues
  bulk-open-issues
The list above includes a couple of pre-prepared sample bulk requests, which can also be found in the index configuration folder.
bulk-open-issues.jsonincludes all open issues as a snapshot that was grabbed from Elasticsearch project on GitHubbulk-closed-issues.jsonincludes some of the closed issues.
Let’s dump them all into our Elasticsearch cluster.
bash-4.4# elash index bulk github bulk-closed-issues bulk-open-issues

Progress
------------------------------------------------------------------------------
  % Total    % Received % Xferd  Average Speed   Time    Time     Time  Current
                                 Dload  Upload   Total   Spent    Left  Speed
100 9929k  100  463k  100 9466k   247k  5062k  0:00:01  0:00:01 --:--:-- 5310k

Bulk to github
------------------------------------------------------------------------------
{
  "took": 1692,
  "errors": false,
  ...

(trancated...)

Commands/Options:
  bulk-closed-issues
  bulk-open-issues
We can see the returned responses are truncated. This is because there are too many issues being processed and the response will be very large if we dump all the outputs to the console.
Search documents
After populated the data, you can run index search command to search document using pre-prepared search query. Follow the same pattern and let Elastic Shell tell you what’s next to be append at the end of the command.
Delete index
To delete the index, it’s easy. Just run index delete command. Again, we can delete multiple indices in one line.
bash-4.4# elash index delete github companydatabase

Delete github
-------------------------------------------------
{
  "acknowledged": true
}

Delete companydatabase
-------------------------------------------------
{
  "acknowledged": true
}

Commands/Options:
  companydatabase
  github
  ...
If you run index cat indices command, you will see the two indices have gone.
For more stories on Elastic Shell, stay tuned for next posts! Any question about this post or Elastic Shell, feel free to leave comments or drop email at morningspace@yahoo.com.
留下评论
您的电子邮箱地址并不会被展示。请填写标记为必须的字段。 *