多人开发中的合并冲突是我们使用Git时常常会遇到的情况,小小合并门道大,讲述合并的那些事儿,晴耕 · 白话之“Git合并那些事”系列持续连载中……
注:
本文采用知识共享署名-相同方式共享 4.0 国际许可协议进行许可。

为什么没有Theirs策略?
前面提到Ours策略,也许大家会认为一定还有一个Theirs策略。Recursive策略里不就有-Xours和-Xtheirs参数吗?有意思的是,如果我们翻Git的文档,也许会觉得奇怪,居然没有Theirs策略!
事实上,Git在以前的版本里是有Theirs策略的,但后来它被去掉了。其实道理也很简单,因为它太危险了。正如Ours策略会毫不犹豫地丢弃被合并分支上的修改,Theirs策略也会毫不犹豫的丢弃当前分支上的修改。这相当于自己之前在当前分支上所做的工作全部丢掉了!
如果你真的想丢弃自己的修改,完全可以用其他git命令来代替。比如,还是继续前面的例子。先回退到上次合并前的提交记录c8:
$ git reset --hard HEAD^
HEAD is now at 306f03a c8
然后新建一个分支,用来备份我们在当前分支上所做的工作:
$ git branch i-was-stupid
此时,我们在master分支上的提交历史是这样的:
$ git log --oneline --graph
* 306f03a (HEAD -> master, i-was-stupid) c8
*   0935c24 c6
|\
| *   26dfc71 (feature2) c3
| |\
* | \   1725ff2 c5
|\ \ \
| | |/
| |/|
| * | 39b06d9 c1
* | | c096f34 c4
| |/
|/|
* | ff8acc9 c2
|/
* 8937d6a c0
然后,我们执行git reset,指定:回退到feature1上head指针所指向的提交记录c7:
$ git reset --hard feature1
HEAD is now at 9232cf1 c7
再观察master分支的提交历史,会发现之前不在feature1分支上出现的提交记录c3,c6,c8都不见了:
$ git log --oneline --graph
* 9232cf1 (HEAD -> master, feature1) c7
*   1725ff2 c5
|\
| * 39b06d9 c1
* | c096f34 c4
* | ff8acc9 c2
|/
* 8937d6a c0
master分支上余下的提交历史和feature1的提交历史是完全一样的:
$ git checkout feature1
Switched to branch 'feature1'
$ git log --oneline --graph
* 9232cf1 (HEAD -> feature1, master) c7
*   1725ff2 c5
|\
| * 39b06d9 c1
* | c096f34 c4
* | ff8acc9 c2
|/
* 8937d6a c0
Octopus策略
前面我们介绍的Recursive策略和Resolve策略都是针对两个分支的合并。假如我们要合并的分支超过两个,那该怎么办呢?这个时候,我们依然可以使用Recursive策略,对分支进行两两合并。但是,这样做每合并一次就会产生一个新的合并提交(merge commit)。过多的合并提交出现在提交历史里,会成为一种“杂音”,对提交历史造成不必要的“污染”,让它变得更加复杂,更难看懂。
这个时候,Octopus策略就派上用场了。Git在对两个以上的分支进行合并时,会自动选择Octopus策略。它的主要特点在于,只会生成一个合并提交,从而最大限度地减少了因为合并对提交历史造成的“污染”。因为按照这种合并策略得到的提交历史形似章鱼,所以名字还是起的很形象的。
下面我们就通过实际例子来感受一下。首先,我们新建一个本地Git库,叫做test-octopus-merge:
$ git init test-octopus-merge
Initialized empty Git repository in /root/test-octopus-merge/.git/
$ cd test-octopus-merge
在master分支上新建README文件:
$ vi README
$ cat README
Merge strategies include:
* Resolve
* Octopus
* ...
并建立提交记录c0:
$ git add .
$ git commit -m c0
[master (root-commit) 849aa5b] c0
 1 file changed, 4 insertions(+)
 create mode 100644 README
然后新建两个分支,feature1和feature2:
$ git checkout -b feature1
Switched to a new branch 'feature1'
$ git checkout -b feature2
Switched to a new branch 'feature2'
并且,分别在分支feature2上建立提交记录c1:
$ vi README
$ cat README
Merge strategies include:
* Recursive
* Resolve
* Octopus
* ...
$ git commit -am c1
[feature2 c60b6e8] c1
 1 file changed, 1 insertion(+)
在feature1上建立提交记录c2:
$ git checkout feature1
Switched to branch 'feature1'
$ vi README
$ cat README
Merge strategies include:
* Resolve
* Ours
* Octopus
* ...
$ git commit -am c2
[feature1 79cc879] c2
 1 file changed, 1 insertion(+)
在master上建立提交记录c3:
$ git checkout master
Switched to branch 'master'
$ vi README
$ cat README
Merge strategies include:
* Resolve
* Octopus
* Subtree
* ...
$ git commit -am c3
[master 3d795fb] c3
 1 file changed, 1 insertion(+)
最后,执行git merge,把feature1和feature2一次性合并到master:
$ git merge -m c4 feature1 feature2
Trying simple merge with feature1
Simple merge did not work, trying automatic merge.
Auto-merging README
Trying simple merge with feature2
Simple merge did not work, trying automatic merge.
Auto-merging README
Merge made by the 'octopus' strategy.
 README | 2 ++
 1 file changed, 2 insertions(+)
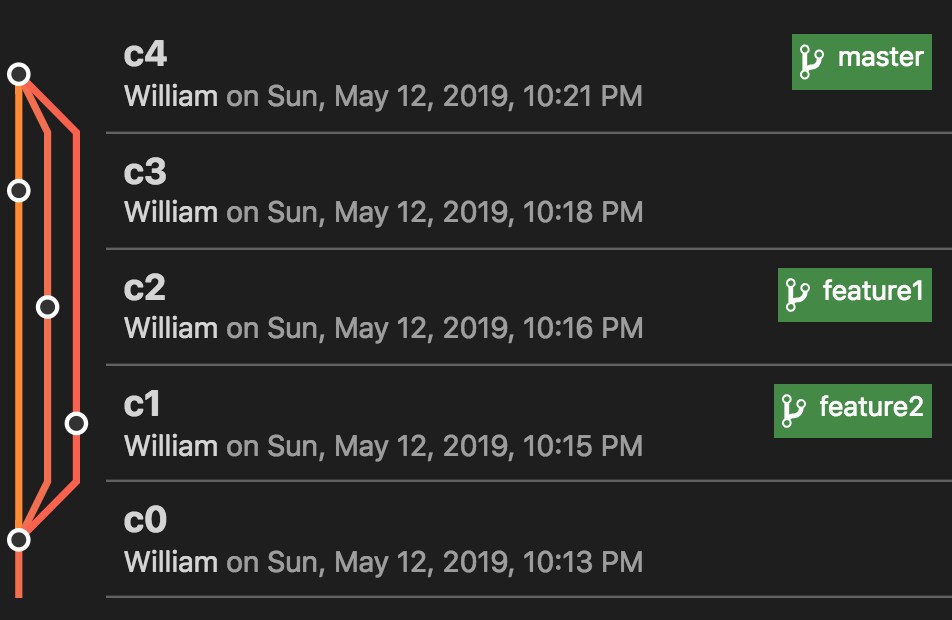
从输出结果中可以看到,Git的确在合并时采用了Octopus策略。这个时候,再用git log查看提交历史,会发现分支feature1和feature2在向master合并时只生成了一个提交记录,即c4:
$ git log --graph --oneline --all
*-.   d2780ca (HEAD -> master) c4
|\ \
| | * c60b6e8 (feature2) c1
| * | 79cc879 (feature1) c2
| |/
* | 3d795fb c3
|/
* 849aa5b c0
如图所示,c4就是c1,c2,c3在分支合并后产生的合并提交:

如果要是采用Recursive策略会怎么样呢,让我们先退回到提交记录c3:
$ git reset --hard HEAD^
HEAD is now at 3d795fb c3
然后,在master分支上逐个合并feature1和feature2:
$ git merge -m c4 feature1
Auto-merging README
Merge made by the 'recursive' strategy.
 README | 1 +
 1 file changed, 1 insertion(+)
$ git merge -m c5 feature2
Auto-merging README
Merge made by the 'recursive' strategy.
 README | 1 +
 1 file changed, 1 insertion(+)
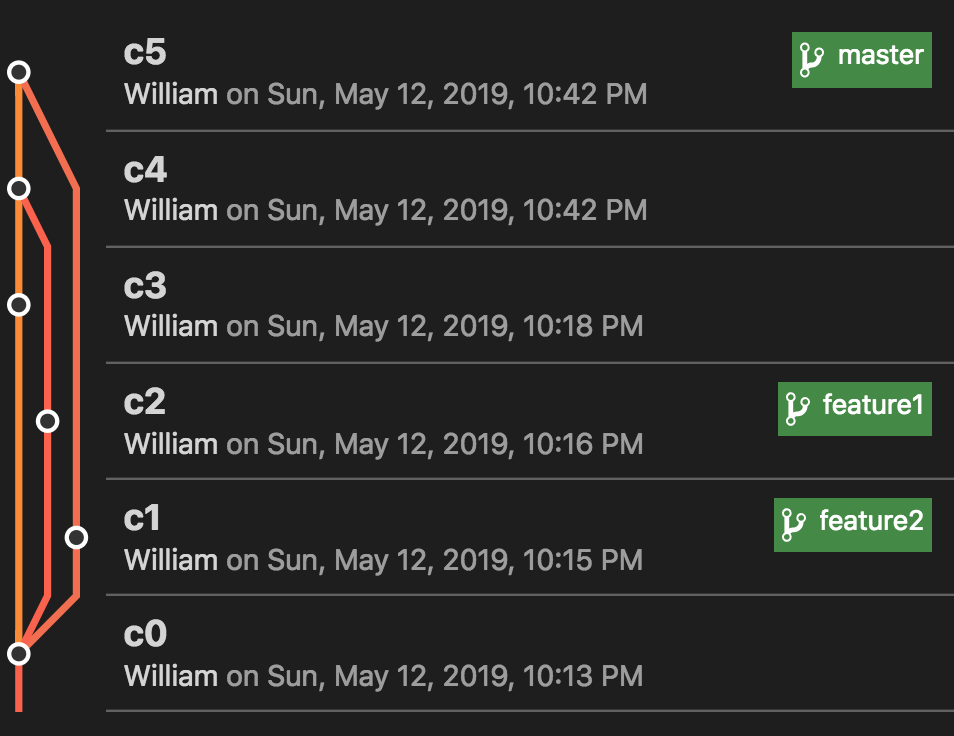
从输出结果中可以看到,这次Git使用了Recursive策略。这个时候,我们观察提交历史就会发现,每合并一次都会产生一个新的提交记录:
$ git log --graph --oneline --all
*   5544665 (HEAD -> master) c5
|\
| * c60b6e8 (feature2) c1
* |   dfef4b0 c4
|\ \
| * | 79cc879 (feature1) c2
| |/
* | 3d795fb c3
|/
* 849aa5b c0
其中,c4是在合并feature1时产生的,c5是在合并feature2时产生:

最后,关于Octopus策略还有一点需要说明:尽管它功能十分强大,但实际使用的机会却并不多。可以想像,如果一下子要合并五六个分支,那是一种什么样的感觉。平时我们遇到最多的,还是两个分支合并的情况。
Subtree策略
Subtree是一种比较特别的策略。它通常用于这样的场合:假设有两个项目A和B,其中项目A依赖于项目B。我们可以把项目B的内容映射到项目A的一个子目录下。那么当把项目B合并到项目A时,我们可以选择Subtree策略,Git会帮我们自动把项目B的内容更新到项目A的对应子目录下。下面我们就用一个例子来演示一下。
首先,我们新建一个本地Git库,叫做test-subtree-merge:
$ git init test-subtree-merge
Initialized empty Git repository in /root/test-subtree-merge/.git/
$ cd test-subtree-merge
在master分支上新建一些文件:
$ vi README
$ cat README
Understanding Git for Dummies: Subtree Merge
$ vi VERSION
$ cat VERSION
1.0
并建立提交记录c0:
$ git add .
$ git commit -m c0
[master (root-commit) a7dd35a] c0
 2 files changed, 2 insertions(+)
 create mode 100644 README
 create mode 100644 VERSION
接下来,我们要把另一个项目作为当前项目的依赖加入到test-subtree-merge里。这里我们使用的是Hello Git项目的Docker镜像。其中,代表Git服务的镜像morningspace/lab-git-remote自带了一个Git库:hello-git。现在,我们就用git remote add命令在当前项目里创建一个指向hello-git的远程引用:
$ git remote add -f hello-git git@my-git-remote:~/hello-git.git
Updating hello-git
warning: no common commits
remote: Counting objects: 6, done.
remote: Compressing objects: 100% (2/2), done.
remote: Total 6 (delta 0), reused 0 (delta 0)
Unpacking objects: 100% (6/6), done.
From my-git-remote:~/hello-git
 * [new branch]      master     -> hello-git/master
其中,指定参数-f是为了让Git能在执行完git remote add之后立刻执行git fetch,从远程库把hello-git的内容下载到本地,但是并不立即合并。
接下来,我们在当前项目上新开一个分支hello-git,并把下载到本地的hello-git保存到该分支上:
$ git checkout -b hello-git hello-git/master
Branch 'hello-git' set up to track remote branch 'master' from 'hello-git'.
Switched to a new branch 'hello-git'
通过对比可以发现,两个分支上的内容的确是不同的:
$ ls
README
$ cat README
Hello Git!
$ git checkout master
Switched to branch 'master'
$ ls
README	VERSION
$ cat README
Understanding Git for Dummies: Subtree Merge
其中,hello-git分支对应的是作为依赖项目的hello-git,master则对应的是当前项目。
现在,我们要把hello-git的内容放到master分支上的一个子目录下了。这里我们需要用到git read-tree命令,它会把hello-git分支上的tree对象读入当前项目的暂存区(staging area)和工作目录(working directory)。并且,还可以通过参数--prefix指定子目录的名字。关于tree对象和git read-tree命令的更多内容,可以参看“Git解密——Tree对象和Commit对象”一文。
$ git read-tree --prefix=hello-git/ -u hello-git
检查当前目录可以看到,在项目的根目录下的确多了一个子目录hello-git。而且,它所包含的正是hello-git的内容:
$ ls
README	VERSION  hello-git
$ cat hello-git/README
Hello Git!
我们把hello-git子目录提交到本地库:
$ git commit -m c1
[master e6d5826] c1
 1 file changed, 1 insertion(+)
 create mode 100644 hello-git/README
这个时候,假设hello-git有了更新,我们可以切换到hello-git分支,然后利用git pull命令下载更新:
$ git checkout hello-git
Switched to branch 'hello-git'
Your branch is up to date with 'hello-git/master'.
$ git pull
remote: Counting objects: 3, done.
remote: Compressing objects: 100% (2/2), done.
remote: Total 3 (delta 0), reused 0 (delta 0)
Unpacking objects: 100% (3/3), done.
From my-git-remote:~/hello-git
   038dce5..fb23aeb  master     -> hello-git/master
Updating 038dce5..fb23aeb
Fast-forward
 .gitignore | 0
 1 file changed, 0 insertions(+), 0 deletions(-)
 create mode 100644 .gitignore
然后再切换到master分支:
$ git checkout master
Switched to branch 'master'
利用git merge进行合并,并选择subtree作为合并策略:
$ git merge -s subtree --no-commit --allow-unrelated-histories hello-git
Automatic merge went well; stopped before committing as requested
然后提交:
$ git commit -am c2
[master dbf7309] c2
注意,在执行git merge时,如果你所使用的Git是2.9及以上版本,那就需要加上一个--allow-unrelated-histories参数,否则Git会报“fatal: refusing to merge unrelated histories”的错误。
这时我们通过git log查看提交历史会发现,Git在合并时会把hello-git的提交历史也加入进来:
$ git log --oneline
dbf7309 (HEAD -> master) c2
fb23aeb (hello-git/master, hello-git) add more
e6d5826 c1
a7dd35a c0
038dce5 say hello to git
cb1130c init commit
如果我们不希望在当前项目里出现依赖项目的提交历史,可以在合并时加上--squash参数。为了演示这一点,让我们先回到提交记录c1:
$ git reset --hard e6d5826
HEAD is now at e6d5826 c1
然后再执行一次合并,带上--squash参数:
$ git merge -s subtree --squash --no-commit --allow-unrelated-histories hello-git
Squash commit -- not updating HEAD
Automatic merge went well; stopped before committing as requested
并提交:
$ git commit -am c2
[master 194c075] c2
 1 file changed, 0 insertions(+), 0 deletions(-)
 create mode 100644 hello-git/.gitignore
这个时候再执行git log,就会发现整个提交历史都是当前项目的,非常干净:
$ git log --oneline
194c075 (HEAD -> master) c2
e6d5826 c1
a7dd35a c0
另一种方法
前面所使用的方法,需要在当前项目里新建一个分支用来保存hello-git的提交历史和内容。如果你不是很介意hello-git和当前项目的提交历史混在一起,那么还有一种更简单的做法,不需要建立额外的分支。为了演示这一点,我们先把当前项目恢复到初始状态(提交记录c0处),并删除分支hello-git:
$ git reset --hard a7dd35a
HEAD is now at a7dd35a c0
$ git branch -D hello-git
Deleted branch hello-git (was fb23aeb).
然后,使用git merge直接把hello-git的提交记录下载到master分支上:
$ git merge -s ours --no-commit --allow-unrelated-histories hello-git/master
Automatic merge went well; stopped before committing as requested
因为这里我们使用了Ours合并策略,所以只有hello-git的提交历史被下载到当前项目,而当前项目的内容则不会被hello-git所覆盖。
紧接着,我们还是利用git read-tree把hello-git的tree对象读入当前项目的暂存区和工作目录。和前面相比,参数-u后面跟的不再是本地的hello-git分支了,而是指向hello-git远程Git库的远程引用:
$ git read-tree --prefix=hello-git/ -u hello-git/master
上述命令执行的效果和前面一样,当前项目里多了一个hello-git子目录:
$ ls
README	VERSION  hello-git
现在我们把内容提交:
$ git commit -m c1
[master efa288f] c1
如果这个时候hello-git有更新,我们可以不用先在分支上执行git pull下载更新,然后再合并;而是直接在master分支上用git pull进行合并。在Git里,git pull和git merge一样,都支持通过参数-s来指定合并策略:
$ git pull -s subtree hello-git master
remote: Counting objects: 3, done.
remote: Compressing objects: 100% (2/2), done.
remote: Total 3 (delta 0), reused 0 (delta 0)
Unpacking objects: 100% (3/3), done.
From my-git-remote:~/hello-git
 * branch            master     -> FETCH_HEAD
   fb23aeb..67d7938  master     -> hello-git/master
Merge made by the 'subtree' strategy.
 hello-git/.gitignore | 1 +
 1 file changed, 1 insertion(+)

留下评论
您的电子邮箱地址并不会被展示。请填写标记为必须的字段。 *